This tutorial shows how to build something very simple in Notion: a database. We will use the Notion API and any form that can send a POST request
Notion is hard to describe. The tool manages notes, TODOs, tables, images, and a plethora of content that can help organise our lives — or make it utterly chaotic if we fall into the "let me just create another Notion dashboard" black hole.
Table of Contents
Focus
This tutorial shows how to build something straightforward in Notion: a database. We will use the Notion API and any form that can submit a POST request.
Skills needed
This tutorial can be read and understood by anyone with basic programming knowledge.
To reproduce it, you must have a basic understanding of Javascript, HTML and CSS and know a little about how NextJS works.
Why?
Let's ponder: what is a database? Why should I create it? What's the meaning behind all of this? Is life worthy?
While you think about all of those, I'll give you a shortcut on the first two:
A database is, very basically, a table. You might want to store information about who's going to your party or what items are lacking in your storage; I don't know. The important part is that with a database, you can not only store this information but list, filter, and display it as you want.
If you are more tech-savvy, you know there's a lot more to databases than this, but this description will be enough for our usage.
In this tutorial, we will create a database with a simple focus: getting the RSVP for a party. This document is a simple example I've tried in real life, so it's tested and proven.
What this tutorial lacks?
I purposefully left out some stuff from this tutorial for simplicity. For example:
- Our database is simple and has no links with other pages — which would make it genuinely relational.
- Our form has no way of detecting bots and crawlers.
- We do not validate our form's information — Frontend or Backend.
Notion
You must first create an account in Notion — something you can do with two clicks.
There are videos about "how to use Notion" around, but don't get too lost on those — I remember skipping lunch more than once after a few hours of these simple tutorials.
Creating a database
On the left pane, you will see Private and a + symbol. If you click it, you will create a new Page.
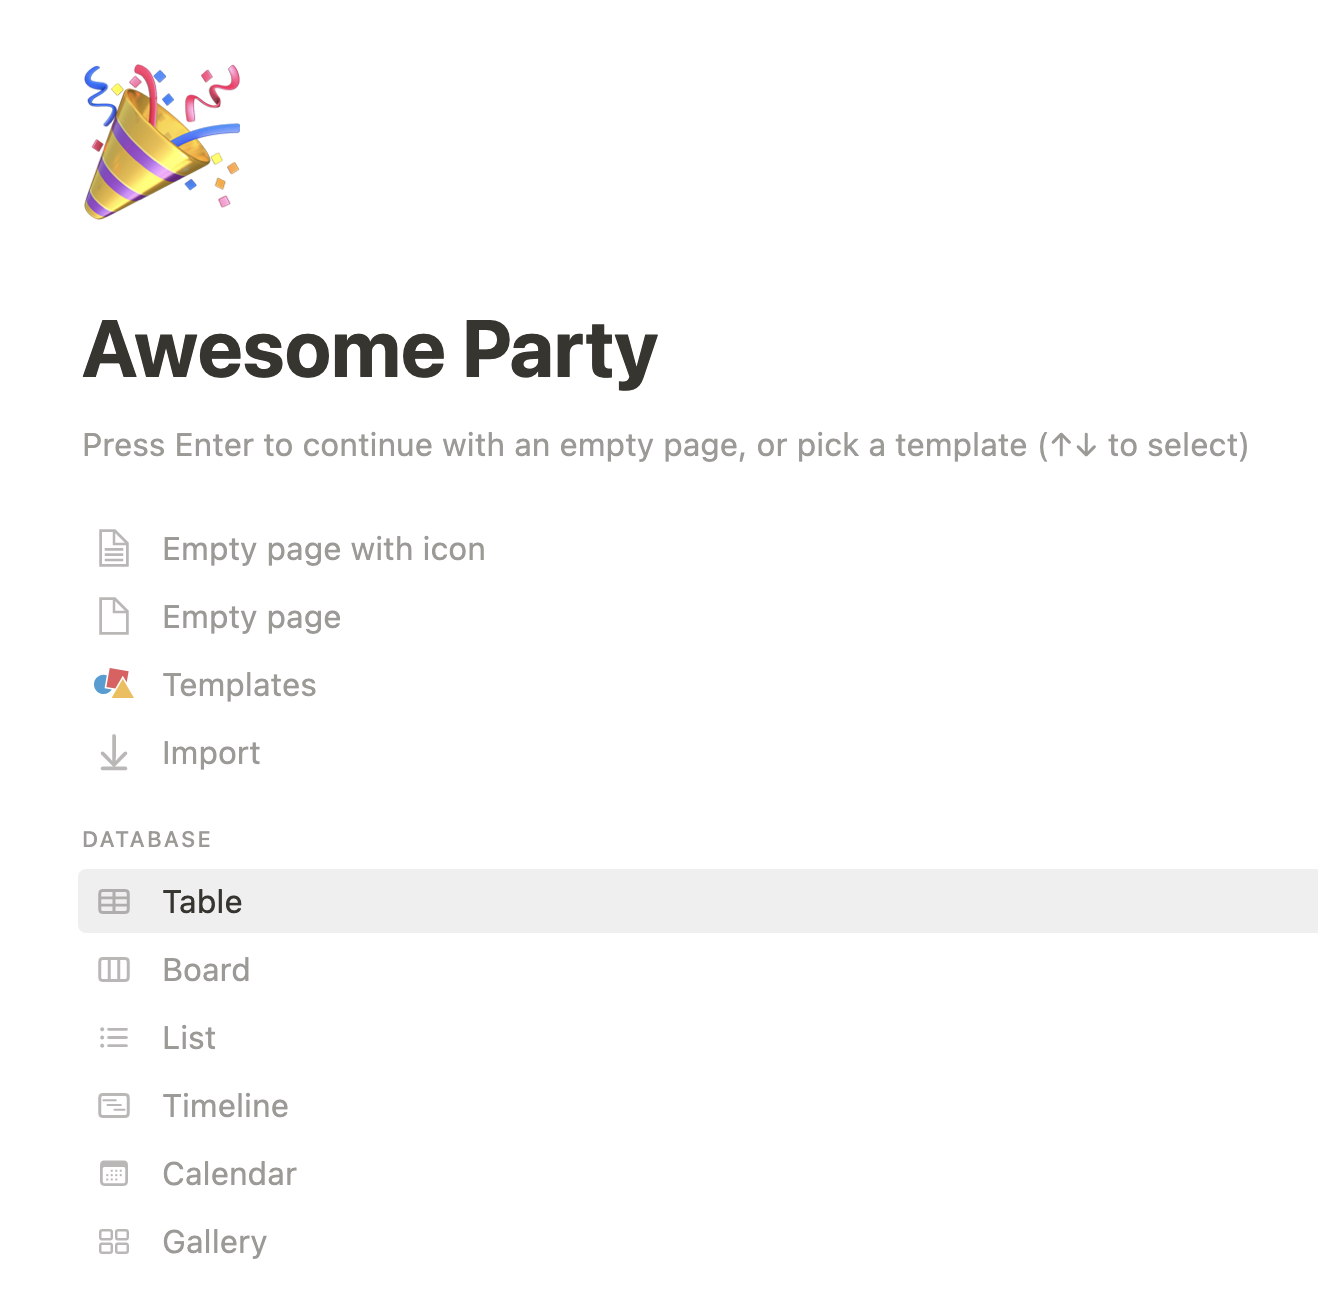
You can see some options on what to do with that new page. Add a good name, an icon or a header, and click that highlighted Table under (guess?) Database.
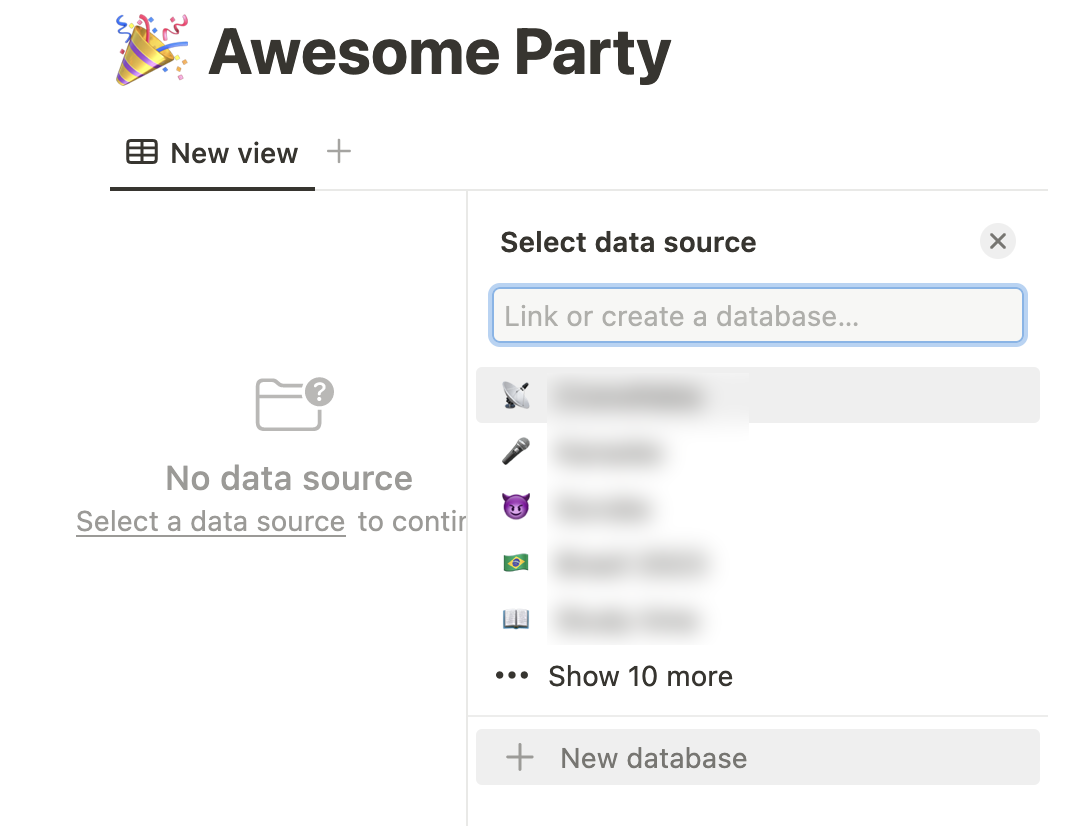
This database is still empty, so Notion asks you to select a data source. Let's create a new one from scratch by clicking new database.
Now we have our excellent database ready for destructi... I mean, customisation!
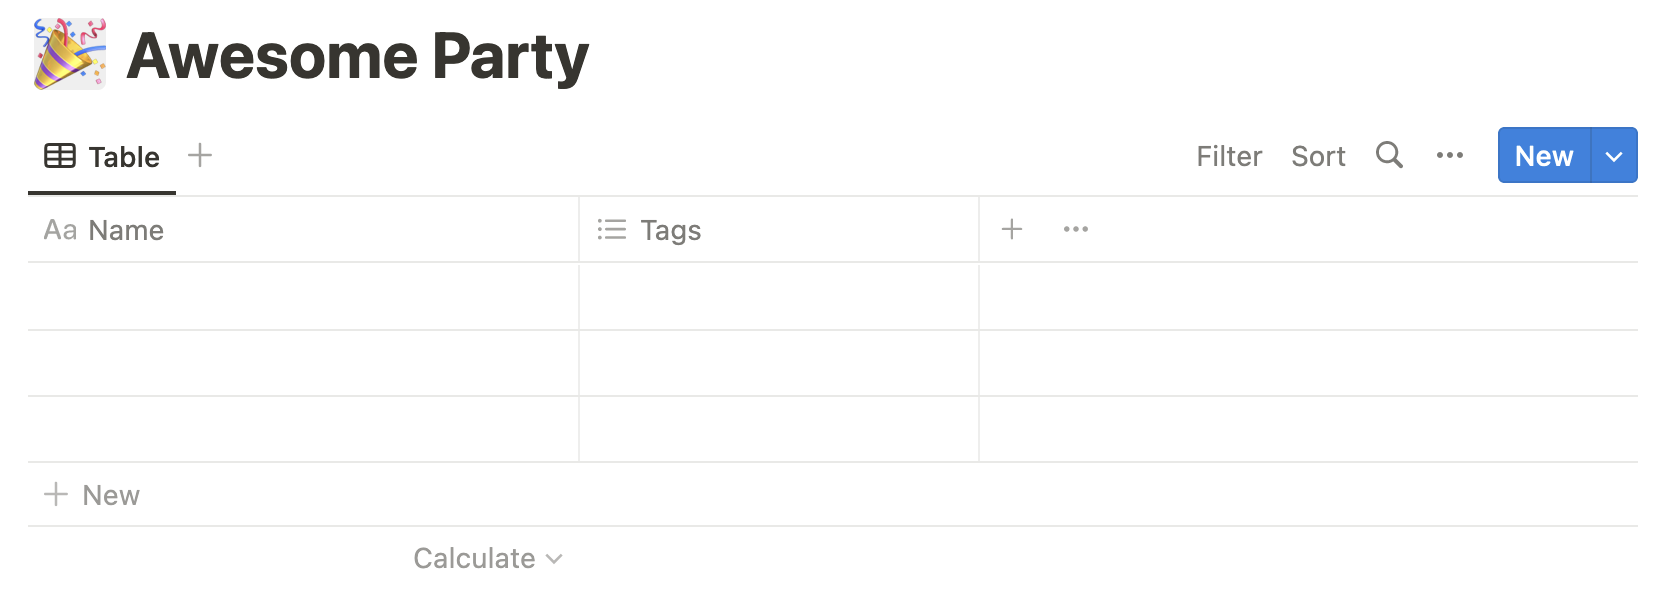
Customising the columns
This database has columns and rows (it's just a table, remember?). The columns are what we want to know, and each row is the gathered data.
In this case, for instance, we want to know the following information from our guests-to-be.
- First name
- Last name
- Do they have any food limitations?
- Will they bring a +1?
- How much money will they bring to gift me? (I'm a very straightforward person)
That decided, let's name our table rows with clear and easy-to-use-later names. I avoid whitespaces, prefer separating words with hyphens and write everything in lowercase.
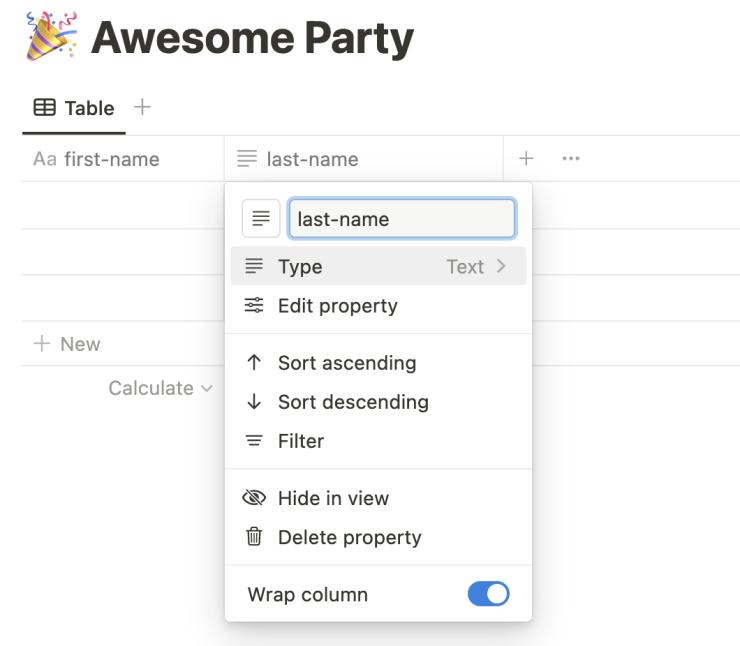
Notion offers many options when creating new columns, but let's keep it simple here. I'll make the following columns:
- first-name (type: Text)
- last-name (type: Text)
- food-limitation (type: Select)
- plus-one (type: Checkbox)
- money-gift (type: Number)
With this, we can cover the most common types of form fields.
The final form will look like this:

Now it's time to make it available to be used by our application.
Accessing this database
To make this database accessible, you must create what Notion calls Integration. To create one, you can access the My Integrations page.
Click the New integration button and fill out the following form. Don't worry about a logo for now.
The most important parts of this form are the Content Capabilities and User Capabilities elements.
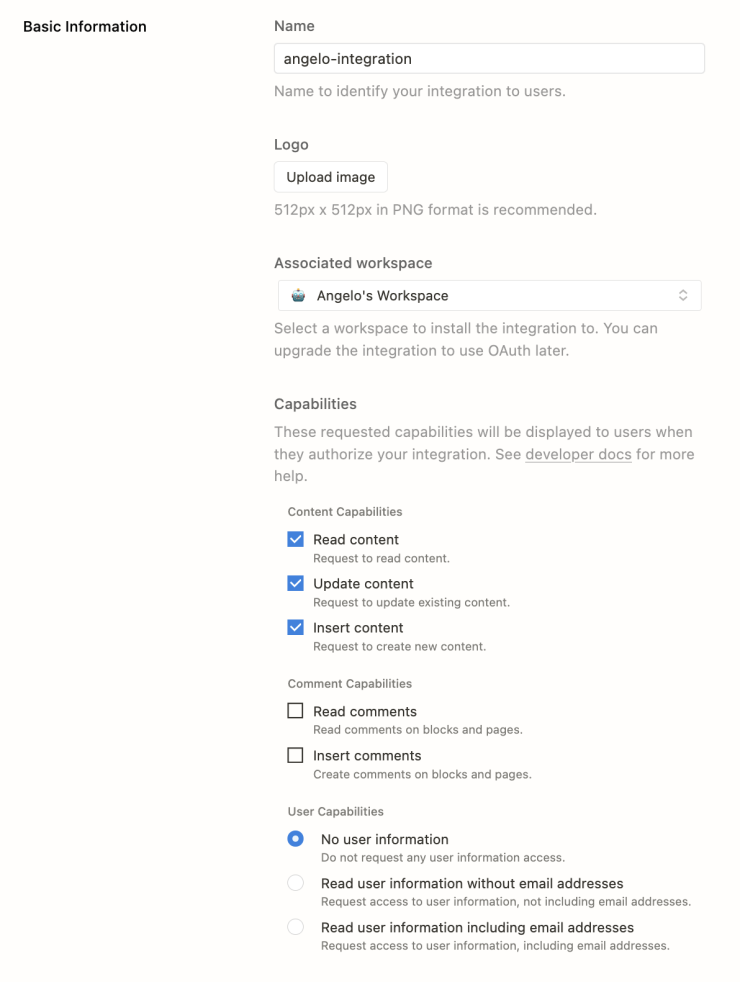
Content Capabilities
Here you should check what your Integration can do in your Notion databases. For instance, if you want only a service to read an already created database, you would only check Read content.
User Capabilities
This field selects what information Notion will capture from the user sending the form. As we don't want it to catch anything else than what is in the form, we can select No user information. Not selecting this option can have legal issues if you don't add a cookie consent tool to your app.
It's a secret
After clicking Submit, you will see a field with confidential data. That's your Integration secret. As the name says, please do not show it to anyone. Copy it because we will use it shortly.
Connecting the connection
After you create your Integration, access your database and, after clicking in the top three-dots menu, go to Add connections at the bottom and select your connection from the following menu. Click confirm, and we're done.
Getting the database key
To change this database in our code, we need a unique secret key and the Integration key we got before.
This value is inside the Notion Database URL, between the so/ and ? E.g., the URL https://www.notion.so/Id?v=version has four parts: https://www.notion.so/, an ID, ?, and another ID starting with v= that represents the file version. What we want is the second part, the ID.
See the example below:
https://www.notion.so/a585d0ccdf3582cea6bdf1d8254813e6?v=44b0e900413547570f2791172fe2d1d5
url: https://www.notion.so/
id: a585d0ccdf3582cea6bdf1d8254813e6
version: v=44b0e900413547570f2791172fe2d1d5
Copy the ID for later use.
What did we do?
After connecting this database with our Integration, whenever we make any API calls with this Integration secret key, Notion will know which databases the API call can modify. In this case, we added this database to that list.
If you try to modify another database without adding an Integration, Notion will return an error, and nothing will be changed.
Code
First, a disclaimer
I know there might be more performant ways to do a form like this or even libraries like Formik to improve it, but I preferred to keep this pure React for the tutorial. There's already a lot going on, and complexity is reduced for brevity.
NextJS Setup
Let's set up a NextJS project as described on their website. So click here and follow the steps. I will create an app with Typescript, but it's easy to follow if you know JS.
yarn create next-app --typescript
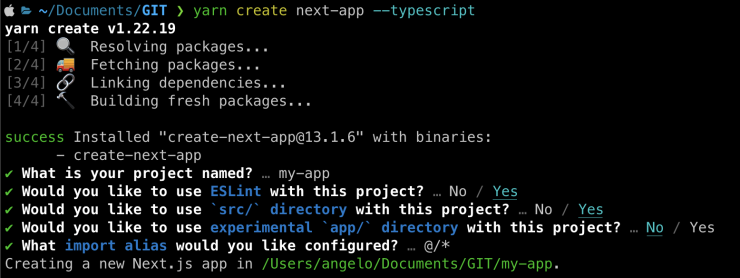
Let's cd into our folder, run yarn dev, and remove everything inside the main tag in the src/pages/index.tsx
HTML
Now, we're going to build our simple HTML form inside main. There's minor CSS to be done, so I'll use the existing Home.module.css file that Next imports by default.
Explaining the code above:
- We added a
formthat encompasses the fields; - There's a wrapper
divon each pair of labels and input because of styling (next part) - There's one input for each name part with the according label;
- There's a
selectfor the fixed food limitations; - A checkbox is added and styled to the +1 question
- A number input is added for the most important question
- A
submitbutton at the end closes the deal.
Styles
As you can see, I've added some classNames there, so let's add this in our Home.module.css in the src/styles folder.
Let's delete everything from this file and add the following styles:
The code above:
- Adds some spacing between the fields with
flexandgap; - Makes the inputs look better by adding
blockorinline.
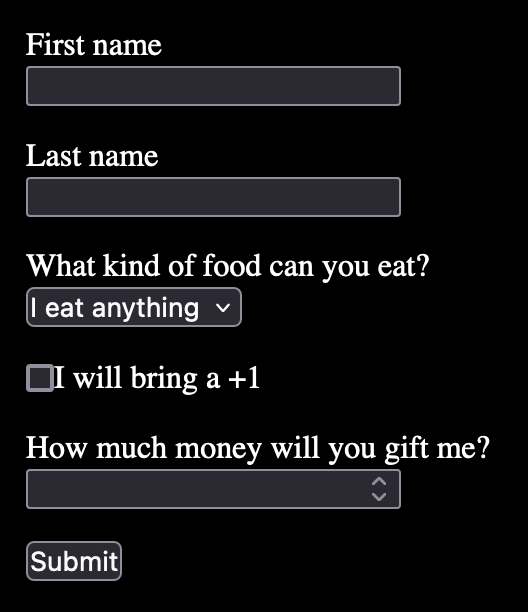
We won't add anything else to reduce complexity. Below is a screenshot of our stunning form:
Frontend
We will first set up what kind of format our form has. Let's set up a simple type after the imports:
"But Angelo, isn't the money-gift a number and the plus-one a boolean?"
Yes, you have great eyes. The issue is that HTML forms need data as strings. We could even save the checkbox value as "boolean", but when passing it back to the controlled component, Typescript would warn us that the checkbox tag does not accept a boolean as a value.
With our types setup, let's add a state to control our component. Add this after the export default function Home() { line:
We set up the values by adding some initial data and pointing it to the proper data structure, FormData. We pre-set some values to avoid submission errors.
To make each field controlled, we'd need to monitor their changes and update the state accordingly. We'd need to add the following code to each input:
That would be repeated in every input, so I preferred to do a helper function to deal with this.
After the useState we wrote, add this:
This function receives a field string — that can be only one of the FormData property names (that's what the keyof does), an event (both Input and Select events), and a value, the string or boolean from the form.
When called, this function will get the current state and update it with the passed data.
Now, in each input (and select), we will add the helper function with the specific label and a value property as well, e.g.:
Important: the checkbox will pass e.target.checked instead of e.target.value.
To finish, we will call a handleSubmit function when the user submits the form — to send this value to our NextJS API.
Line by line, we:
- Add an
asyncto our function. - Prevent the default
onSubmitbehaviour — by refreshing the page. - Add a try-catch clause because we will deal with async/await.
- call the native
fetchwith our local API URL, passing as options:- the stringified body
- the
POSTmethod
fetchsometimes fail without throwing an error, so we added a check here to see if theresponsewas notok.- If so, we
return(to short-circuit the function and stop it from continuing) andalertthe user. - If the
responsewasok, wealertthe user that everything went according to plan. - The
catchclause also returns analert.
Finally, we add this function to our form tag:
Backend
Create a notion.ts file inside src/pages/api. Copy the content from the default generated hello.ts and delete this file.
This file is our "Backend". In it, we will receive the data from the form and pass it forward to the Notion API.
First, let's clean this file.
Remove the Data type and add our FormData:
(You can also export the FormData from our other file and import it here)
Inside the handler function, change the res type to NextApiResponse<void> (we won't return anything on the response's body). Also, add async to handler: export default async function handler.
Remove the json method from res.status(200).json({ name: "John Doe" });, leaving just res.status(200).
Now we have a clean file to work on.
We need to get the form data from the request and parse it.
In the first line of the function, add:
Now, let's connect our Notion API. To do this, we will need the API key and a Database key, which need to be added to our Secrets.
Add a .env file on the project root and add the following there:
Remember the Integration Secret we saved from the last section? Paste it after the NOTION_API_KEY there.
Remember the database ID we saved from the last section? Paste it after the NOTION_PARTY_DB there.
Why are we doing this?
These are personal values, and we don't want to share them with the user that visits our website or with someone that sees our source code. When deploying, these values will be hidden with Vercel or your choice of deployment service.
In our backend code, let's retrieve these values from our secrets and ensure they are present (throwing an error if not).
Let's make sure whatever we want to do with this endpoint only runs when we use a POST by adding a short-circuit clause:
To call the Notion API, we need to add their Javascript library, @notionhq/client. Let's run yarn add @notionhq/client and then import their Client at the top of the file:
After our POST check, let's create a new Notion Client:
Sadly Notion has not had perfect typings, so the best way to use Typescript with their library is to pass the object straight into the create method. So, see the whole part of the code below, and I'll explain it afterwards.
Let's go:
- We
awaita new notionpageto be created — in Notion, that's the terminology for each row in a table; check the docs for more info. - As its options, we must pass a
parentobject with ourdatabase_idinside. - Inside the
propertiesobject is where the magic happens.- Each of the properties of our Notion table needs to be here. The name of the object properties needs to match our column names. In our case,
first-nameand so on. - The first property must have the
titleattribute. In summary, this is the "key" attribute that Notion will use as the title of yourPage— if you have Backend knowledge: they have a key under the hood, so it's OK if this value gets repeated. You can read further on the Notion Docs. - The
last-nameproperty has arich-textinside. Notion does not have a simpleplain-textfield: all of them (excepttitle!) can be formatted in their UI. As we didn't add any rich-text functionality — no bold, italic, whatever — we passed ourdatato thecontentprop. food-limitationhas a simpleselectwith thenameas the chosen option. Notion does not check if this option is valid — if a new option is inserted, they will add it to the list of existing ones and move on (that's why we didn't need to set them up beforehand).plus-oneis a checkbox. All we need to do is to turn ourdatainto the correct format, aboolean.money-giftworks precisely the same: a number field with anumbervalue.`
- Each of the properties of our Notion table needs to be here. The name of the object properties needs to match our column names. In our case,
I hope this description was understandable. Notion has a lot of formats for each row, and their docs are thorough on it. I recommend giving it a good read.
To end our form submission, we return 200 (meaning everything went well) if the response has an id. If not, we return 500 (meaning "ooops").
And... that's it for local development!
Testing
If you didn't do it before, stop the server and rerun it with yarn dev. Open the localhost address and fill out the form (be generous with the money, please). Click submit.
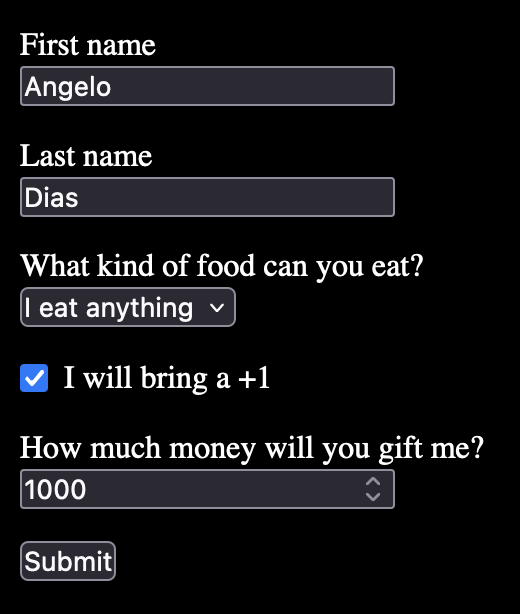
Now, open your database and see the value inserted there:

🎉 TADA! 🎉
Full code
You can find the project in this repository in GitHub, with the entire code inside.
Secrets
You can read the documentation in Vercel or other services to see how to host your form with hidden secrets.
Collaborating
This tutorial would benefit from more use cases with different frameworks and usages (e.g. Remix).
Please don't hesitate to contact me if you iterate on this. I'd love to link it here.


